
Your garage door starts closing, then suddenly reverses for no reason. Or maybe it won't close at all, and the opener lights are blinking at you. Nine times out of ten, you're dealing with misaligned safety sensors. These small devices cause more service calls than any other garage door component, but the good news is you can usually fix them yourself in about 15 minutes.
Did You Know?: About 75% of sensor issues come from simple misalignment or dirty lenses. Most homeowners can fix these problems without calling a technician, saving $150-250 per service call.
Safety sensors have been required on all garage door openers since 1993, and they prevent thousands of injuries every year by stopping the door from closing on people, pets, or objects. When they're not working right, your door becomes less safe and often won't function at all. This guide walks you through aligning your sensors, testing them properly, and knowing when you've hit a problem that needs professional attention.
For broader garage door maintenance practices, check out our complete maintenance and safety tips guide.
What Safety Sensors Do and Why They Stop Working
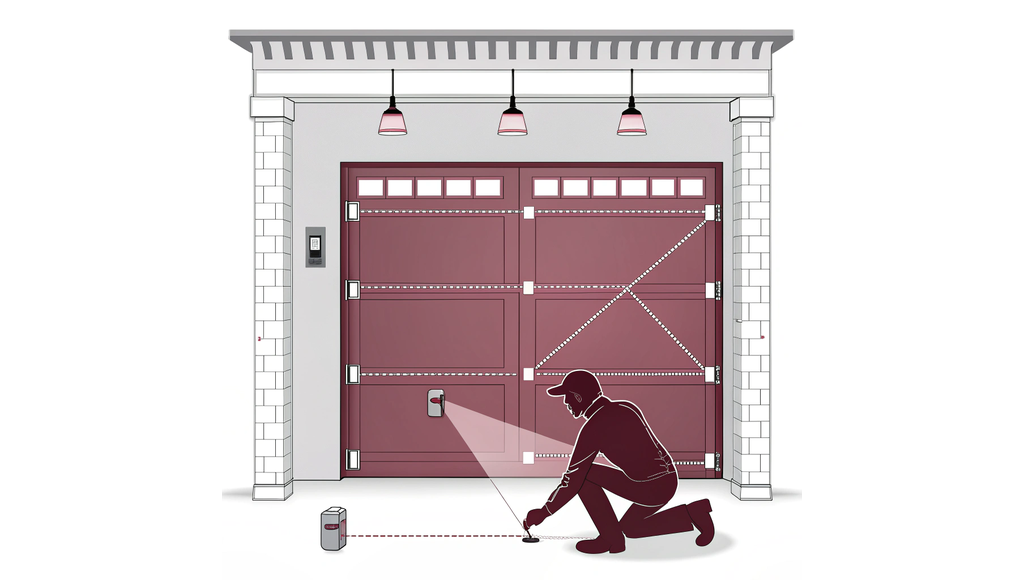
Your garage door has two sensors mounted on either side of the door opening, typically four to six inches off the floor. One sensor (the transmitter) sends an invisible infrared beam across the doorway. The other sensor (the receiver) picks up that beam. If anything breaks the beam while the door is closing, the door immediately reverses. This system has reduced garage door injuries by about 90% since becoming standard.
The transmitter usually has a yellow or amber LED light. The receiver typically shows a green LED. When both lights are steady and bright, your sensors are aligned and working. When one or both lights are blinking, off, or dim, something's wrong.
Most sensor problems come from a few common causes. Misalignment accounts for about 40% of issues. This happens when the mounting brackets get bumped or loosen over time from door vibration. Dirt and debris blocking the lenses cause another 30% of problems. Damaged wiring creates about 25% of failures. Direct sunlight hitting the sensors causes the remaining 5%, usually during specific times of day.
| LED Status | What It Means | Action Needed |
|---|---|---|
| Both steady (amber & green) | Properly aligned | None - system working |
| Transmitter blinking amber | Power issue | Check wiring connections |
| Receiver blinking green | Not receiving beam | Clean lenses, check alignment |
| Both off | No power | Check breaker, opener connection |
How to Align Your Sensors in 15 Minutes
You'll need three things for this job: a screwdriver (usually Phillips head), a small level or a piece of string, and a clean microfiber cloth. The string method works better than eyeballing the alignment and gives you about an 80% first-time success rate compared to 60% when you just guess.
Start by disconnecting power to your garage door opener. Either unplug it or flip the breaker. This takes five seconds and prevents the door from moving while you work. Next, wipe both sensor lenses with your microfiber cloth. You'd be surprised how often this alone solves the problem.
Loosen the wing nuts or screws holding each sensor bracket to the door track. Don't remove them completely, just loosen enough that you can adjust the sensors up and down. Now comes the critical part. Tie a piece of string tightly between the two mounting brackets at the bottom. Use your level to make sure the string is perfectly horizontal. Slide each sensor down until it just touches the string.
Pro Tip: The string method gets sensors level with each other much faster than trying to measure and adjust each side separately. Professionals use this technique because it works.
Face both sensors directly toward each other across the doorway. They should point straight across, not angled up or down. Once you've got them positioned, check your height. Both sensors should sit between four and six inches off the garage floor. This height catches low obstacles like toys or small pets.
Tighten the mounting hardware back down, but don't overtighten. Hand-tight is enough. Cracking the plastic housing creates a bigger problem than you started with. Restore power to your opener and check the LED lights. You should see a steady amber light on the transmitter and a steady green light on the receiver.
Testing Your Sensors After Alignment
Getting the lights to stay steady means your sensors are aligned, but you still need to verify they're actually working to protect you and your family. Run through these four tests every time you adjust your sensors, and repeat them monthly as part of regular maintenance.
First, verify both LED lights remain solid while you open and close the door twice. If they flicker or go out during operation, you still have an alignment issue or loose wiring. Second, place a two-by-four board flat on the floor in the door's path. Close the door using your remote or wall button. The door should reverse immediately when it touches the board. If it doesn't, your sensors aren't communicating properly with the opener.
Third, start closing the door and wave your hand through the sensor beam at about shin height. The door should stop and reverse the moment your hand breaks the beam. This confirms the sensors are detecting obstructions correctly. Finally, run the door through 10 complete open and close cycles. It should operate smoothly every time without random reversals.
Safety Note: Testing your sensors monthly prevents about 70% of sensor failures. This takes five minutes and could prevent a serious injury to a child or pet.
If your door passes all four tests, you're done. The system is working correctly. If it fails any test, go back and check your alignment. Make sure nothing is blocking the sensor path and that both lenses are clean. Sometimes you need to make small adjustments to get everything perfect.
For more help with doors that won't close properly, our guide on fixing garage doors that won't close all the way covers additional troubleshooting steps.
When DIY Isn't Enough
Some sensor problems go beyond simple alignment fixes. If you've cleaned the lenses, aligned the sensors carefully, and run all the tests but still see no LED lights at all, you probably have a wiring issue or dead sensors. Trying to trace electrical problems yourself can create safety hazards and void your opener's warranty.
Check the wires running from each sensor back to the opener motor. If you see any fraying, cuts, or exposed copper wire, stop. This repair needs a professional. Same goes if you notice the sensor housing itself is cracked or broken. Water can get inside and damage the electronics.
Failed alignment attempts also signal it's time to call someone. If you've followed the string method correctly and your receiver LED still won't stay green, the problem is likely internal to the sensor unit. Replacing sensors yourself costs $20-50 for a pair if you're handy with electrical connections. Professional replacement runs $150-300 including labor, but you get proper installation and usually a warranty on the work.
Regional pricing varies. Expect to pay about 20% more in major metro areas compared to smaller cities. Emergency same-day service adds another $100-200 to the bill. For perspective, the national average for sensor diagnosis and repair is $175.
Professional technicians have tools you don't, including multimeters to test voltage and specialized alignment equipment. They can also spot related problems you might miss, like opener force settings that need adjustment. Learn more about protecting your family in our garage door safety and accident prevention guide.
Keeping Your Sensors Working
Most garage door sensor problems start small and get worse over time. A slightly loose mounting bracket vibrates with each door cycle until the sensor drifts completely out of alignment. A tiny spiderweb across the lens blocks just enough of the beam to cause intermittent failures. Catching these issues early saves you from bigger headaches later.
Clean your sensor lenses once a month with a dry cloth. While you're there, check that both LEDs are steady and bright. Give each mounting bracket a gentle wiggle to verify it's still tight. This five-minute monthly check prevents about 70% of sensor failures before they leave you stuck with an open door.
If you've aligned and tested your sensors and everything checks out, you've just saved yourself a service call and kept your garage door working safely. When problems go beyond basic alignment and cleaning, finding a qualified professional is your next step. Regular testing protects your family and keeps your door operating the way it should.
FAQs
How do I know if my garage door sensors are misaligned?
Check the LED lights on each sensor. The transmitter should show a steady amber light, and the receiver should display a solid green light. If either light is blinking, dim, or off completely, your sensors are misaligned. You might also notice your door reversing immediately when trying to close or refusing to close at all. These are clear signs the infrared beam between sensors is blocked or interrupted.
Can I align garage door sensors myself without professional help?
Yes, about 75% of sensor issues come from simple misalignment or dirty lenses that you can fix yourself in about 15 minutes. You only need a screwdriver, a piece of string or small level, and a clean cloth. Most homeowners successfully align their own sensors using the string method, saving $150-250 on service calls. Call a professional only if you see damaged wiring or cracked sensor housings.
How often should I test my garage door safety sensors?
Test your sensors monthly with a quick check and run a full test every quarter. Monthly testing prevents about 70% of sensor failures before they become serious problems. The basic test takes five minutes. Just place a board in the door's path and make sure the door reverses when it touches the obstruction. Also wave your hand through the sensor beam to verify it stops the door immediately.
What should I do if my sensors still don't work after alignment?
First, clean both sensor lenses thoroughly and check that nothing blocks the beam between them. Verify all mounting brackets are tight and both sensors sit at the same height, about four to six inches off the floor. If LEDs remain off after these steps, you likely have a wiring problem or dead sensors that need professional replacement. Check for visible wire damage before calling a technician.
- garage door safety sensors
- garage door won’t close sensors
- fix garage door sensors
- garage door sensor testing